
This post describes some (good) experience using the Lumix G9 6K photo mode, and explains how to handle the 6K video files on a computer, which is harder than you might expect currently. Note: I have made a few updates to my original post to reflect additional things that I have tried and information contributed by others.
4K and 6K photo modes
A favorite feature of mine on my older Lumix GX8 camera was 4K photo mode, which let you set exposure details, for example set a fast shutter speed to freeze fast action, and then take a 4K video from which you could extract 8MP JPEG images, taken at 30 frames a second. This was great for fast action sequences for wildlife, sports, and more. The new Lumix G9 cranks up this capability – with 4K photo mode you can now get 60 frames a second, or you can use 6K photo mode, which takes 30 frames per second but lets you extract 18MP images, so significantly higher quality.
6K photo mode examples
I did an extensive test of 6K photo mode at the fun end of season “pond skim” event at Telluride ski resort. This was also a great test of auto focus with some fast moving action. It passed with flying colors when using 6K mode – pretty much every frame was in focus in dozens of clips, despite very fast moving action, with skiers moving from over 100 feet away to maybe 6 feet away in a couple of seconds, at speeds around 30-40 mph. I used AFC in 255 point focus mode for this, without any custom settings. I was using the Lumix 12-35mm f/2.8 lens with a shutter speed of 1/2000s. Interestingly, I also took several sequences using the “Super high speed” burst mode which takes RAW images at 20 frames per second with autofocus, and while autofocus worked reasonably well and got most shots in focus, there were significantly more out of focus than with the 6K photo mode.
Here’s an example of one of the photos taken in 6K Photo mode – click on it to see a larger assortment at Flickr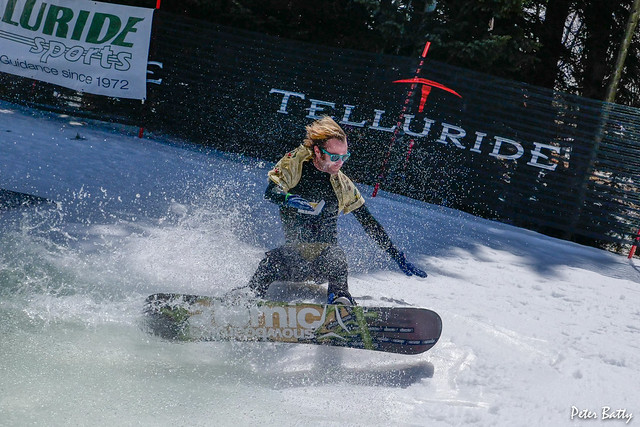
I was very impressed with the sharpness of these images.
A nice benefit of using 6K photo mode is that you get video footage in addition to photos. Here is a video compilation from the same event, with clips of the footage that I used to create the photos. This is a 4K video.
Telluride pond skim 2018 in 4K from Peter Batty on Vimeo.
Working with 6K videos
The 6K video files that are produced by the Lumix G9 are somewhat challenging to work with on a computer at the moment. You can extract pictures in camera, but the process for this is a bit cumbersome, and you only have a small screen (though it might be better if you use an HDMI connector to plug in to a bigger screen, but I haven’t tried that).
Update: with a more recent shoot of some barn swallows, I did try extracting JPEGs in camera, while plugged into a larger screen using an HDMI cable. This worked better than I thought, and was quite quick once I got into it. One benefit of this approach is that the JPEG images have their EXIF data set correctly, including data and time, shutter speed, etc, which doesn’t happen with the other approaches that I mention below. Also, a nice trick that only works with this approach is that you can set “markers” in the video by pressing the Fn2 button while recording, to make it easy to find points of interest during a longer video. You can see these markers when viewing the video in camera, but not (I don’t think) using any of the other techniques.
Several applications on my laptop just didn’t recognize the 6K video, including Lightroom, which is what I have mainly used in the past to extract frames from my 4K video files. After a little digging around online, I found out that this is because they use a new video compression technique called H.265, which “is one of several potential successors” to the widely used H.264 standard, according to Wikipedia. The widely used VLC video player displayed the first frame and then just choked (as of version 2.2.8 on April 20, 2018). I have a maxed out 2017 MacBook Pro, so a pretty powerful machine.
However, I did find some ways to work with the files on my Macbook …
Quicktime Player
I had by far the best results using the Apple Quicktime Player. This played the 6K videos with no problem at all – no lag or stuttering or anything. Quicktime Player also has the nice feature that if you pause, the left and right arrows take you back and forward a frame at a time, which is great for selecting frames that you want to grab. However, there’s no way to zoom in within Quicktime, that I have found, which would be nice to have. Up to this point I hadn’t known how to copy a frame using Quicktime, but after a bit of googling I found that you can just do a Copy (Apple-C) while the movie is paused, and then switch to the Apple Preview application and do “File -> New From Clipboard” (Apple-N). Then you need to save the image in preview (Apple-S). This is somewhat more fiddly than doing the same thing in Lightroom (with lower resolution videos), where you can do the equivalent operation by pressing a single button to capture a frame and save it as a JPEG (see my earlier post on creating composite photos from 4K video for more details).
Using FFmpeg for bulk image extraction
I also looked around for applications that would do a bulk extraction of images from a video. I tried a couple that didn’t recognize the 6K video. I found a command line utility called ffmpeg that did work, though with some issues at first. I installed ffmpeg in the Applications folder on my MacBook, and then if you open a terminal and cd to the folder with your 6K movie file in, the following command extracts every frame to a jpeg image in the same folder:
/Applications/ffmpeg -i P1073570.MP4 P1073570-%06d.jpg
At first glance, this seemed to work pretty well. However, on closer inspection I found some odd pixelated artifacts in a few locations on the image, though most of the image was fine. For example, look at the goggles and nose of the snowboarder here:

Details on the googles are pixelated, which I did not see when I grabbed this image from the video using Quicktime. I wondered if the issue was caused by outputting low quality JPEG files (with a lot of compression). I then tried outputting PNG files instead. This did give higher quality images but they were MUCH larger, and much slower to export. In this case, the full image was 87.3MB in PNG format compared to 2.4MB in JPEG format.
I researched a bit more to see if I could find a way to export higher quality JPEGs, and found that adding the parameter -q:v 2 did the trick (2 is a measure of the JPEG quality, with 2 being the best).
/Applications/ffmpeg -i P1073570.MP4 -q:v 2 P1073570-%06d-2.jpg
This is the same crop from the second version of the JPEG:
The quality is much improved here. Now that I have found this approach, I think this may be the most efficient in many cases, especially if you want to compare and/or extract a larger number of frames – overall it is a lot quicker to convert a whole movie clip to images and then skim through those in Lightroom or another photo viewing / editing tool. You can zoom in with this approach, which is a big advantage. There are ways of specifying start and end times also I believe, I will look into those in due course.
Converting the H.265 video to H.264
I did a quick experiment to try converting the H.265 video to H.264, to see if I could then use the new video in other tools, including Lightroom. I used Handbrake for this, which is a powerful video conversion tool. It worked, but all the software I tried, including Quicktime, really choked on playing the video. It seems that you really need the newer H.265 compression to be able to effectively play a 6K video. Update: it has been reported to me that this approach works fine with Lightroom on Windows.
Update: video editing
A brief update to my original post – I just wanted to mention that I was able to edit the H.265 video fine using Apple’s Final Cut Pro X – I didn’t try any other video editing tools. But as I mentioned in the previous section, I did try converting the video back to H.264 and found the resulting video to be unusable in all the software I tried, so I’m not sure that would be a viable approach to video editing.
Summary
I am extremely impressed with 6K photo mode so far, both how well the autofocus works on fast moving subjects, and the quality of the images I obtained. In this test at least, continuous autofocus worked noticeably better than the 20FPS RAW mode. Dealing with 6K movies on a computer is tricky at the moment, but the two techniques I mention here work well, either interactively viewing the video and capturing a few frames using Quicktime on a Mac, or using ffmpeg with the settings described above to export all the frames from a movie to JPEGs – this should also work on Windows and Linux machines. If you have other techniques that you use, feel free to share below!

Your excellent photos on Flickr tell are show that the method discussed in this blog work.
Great article! Thanks for sharing your knowledge! Cheers